Technische Universität Wien
Orientation and Processing of Airborne Laser Scanning data
Department of Geodesy and Geoinformation - Research Groups Photogrammetry and Remote Sensing
The following is a manual how to checkout form the CVS server. It is a step by step direction manual.
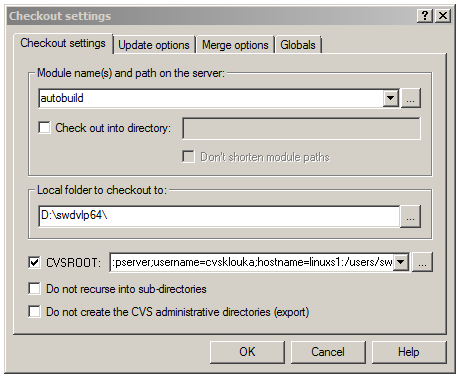
1.swdvlp32
2.swdvlp64
:pserver;username=<USERNAME>;hostname=linuxs1:/users/swdvlp/cvsand then click OK.
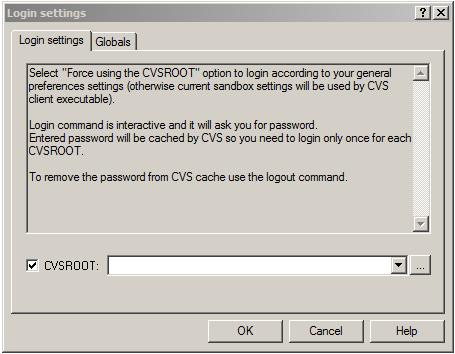
CVSROOT is :pserver;username=<USERNAME>;hostname=linuxs1:/users/swdvlp/cvsand then click OK. After this step the source code will be checkout.Then the source code have to be updated and built.
python -m autobuild opals.csv --platform=x64 -u. or just simply
autobuild opals.csv --platform=x64 -u. This command will update the source code. Then the following command has to be executed
autobuild opals.csv --platform=x64 -b -t 4. This command will build the source code. These commands could be executed as one command using the options -u -b -t together.
After checking out the source code Wizards have to be installed to the Visual Studio so as to be available to be used.
$OPALS_ROOT/swdvlp64/batch/vs_ipf64.bat .This command will start Visual Studio. This .bat file has to be execute every time we want to execute Visual Studio also.$OPALS_ROOT/swdvlp64/opals/tools/opalsWizard/install.bat .With this command the Wizards will be installed. If the setup procedure was successful,then when starting visual studio from vs_ipf64.bat, and go to File-New-Project the following screenshot will be presented. 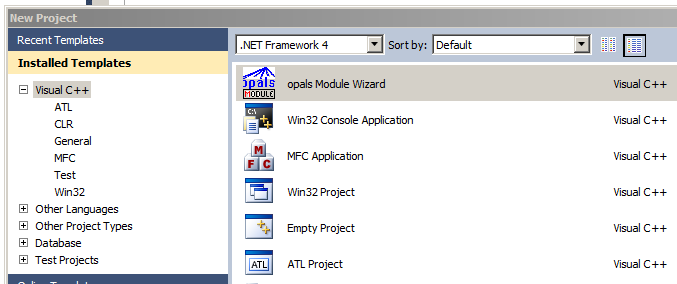
For test purposes it is useful to setup the last build of OPALS. To get the last build of the setup file we have to follow the path : S:/nightly builds/last_successful_build and select between 32bit and 64bit. To be able to use the full version of OPALS the key file has to be used. The key file path is : S:/IPF-Software/Licences/opals.key. Copy this file and paste it to the setup directory of OPALS.
The following manual explains the way to commit a new Module Source code to CVS. This tutorial aims to to prevent user adding to CVS files that are not necessary, actually most of them are used only locally for each user and are created at compilation step.
The following documentation will explain step by step the source code using OPALS framework.
1.- resetModule_ Reset module is used to validate or to predefine the inputs of the module. Reset module could include two types of functions
2.- Set functions : Simple checks on individual parameter values may be realized this way. For containers, the validators are applied one-by-one to each element. Examples :
opts_().geometryModel().set(opals::GeomModel::plane);(opals::GeomModel::plane); opts_().neighbours.set(8); opts_().attribute.set("z"); Set functions are used to predefine mandatory options of the module.
3.- CallBack Functions Specify an action to be taken when a parameter value changes. For containers, the callback is invoked once for all its elements. Example:
opts_().inFile().callback( this, &ModuleZonalFit::cb_inFile );
The callback function must be a member function of this module, with 1 of 2 signatures: (1)
void ModuleZonalFit::cb_inFile();
gets called right after a parameter value has been set (2)
void ModuleZonalFit::cb_inFile(bool open);
gets called
4.- Validators A validator is a function that validates an individual parameter for certain criteria (ex greater,equal,etc..) The validator function is called right after a parameter value has been set, if the parameter is not valid according to the criteria we have already set the program stop the execution and exits. Example of validators :
opts_().searchRadius().validator( Validators::greaterEqual( float(0.) ) );
opts_().inFile().validator(Validators::ODMGDALReadAccess());
The following validation criteria are available. Less,LessEqual,Greater,GreaterEqual,IntervalOpen,IntervalClose,IsIn,IsNotIn, FileExistense,FileReadAccess,FileWriteAccess,DataManReadAccess,GDALReadAccess,ODMGDALReadAccess
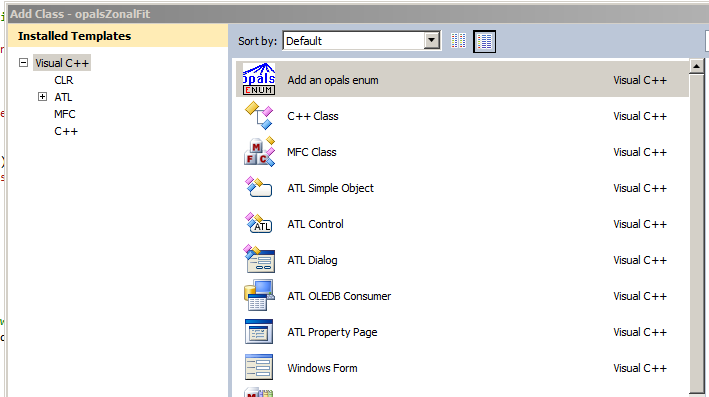
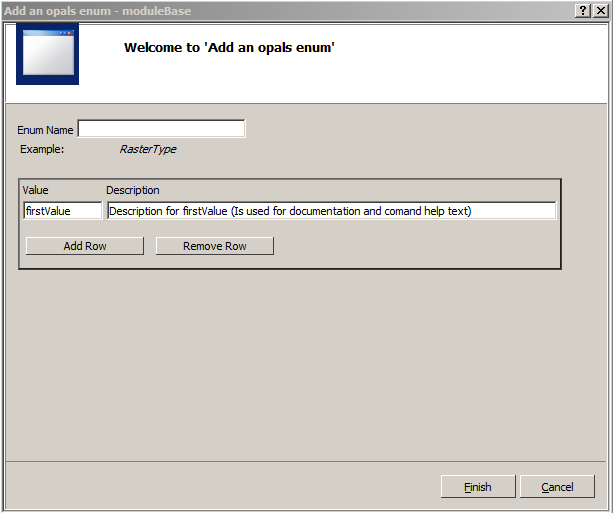
5.- Create New OPALS Enum At the previous section there is a documentation that shows how to set an OPALS module using Wizard.Another wizard that will help to developing process is the enum Wizard. To create an OPALS enum we right click at the project and then select Add->Class and then the following screenshot will be shown:
After that we click add and follow the Wizard to create the new enum.Then the next screenshot will be shown. As soon as the following table will be filled the new enumeration will be created. After the creation of new enumerator to be able to use it the project has to be turned to Release x64 and build the project!! With this procedure the appropriate files for the new enumerator will be created.
6.- runModule_() The run module is the main module of the software. In this method we write the source code to be executed according to the purpose and the description of the module. At the beginning usually we set some variables or define some variables which have been set on the resetModule_. Now we are able to get these values back using ready made functions. For example :
opals::Path inFile = get_inFile();
opals::String aoi = get_aoi();
The rest source code of this method is according to the user's need.
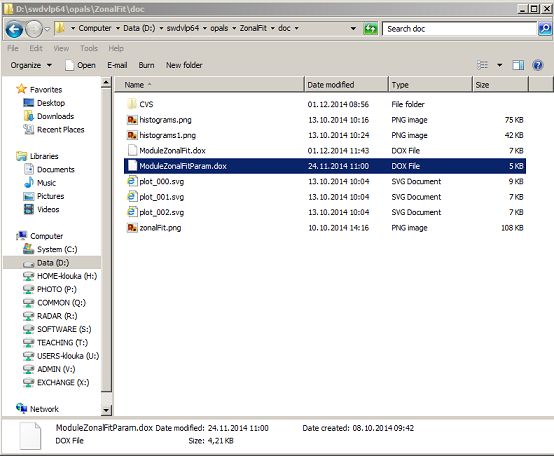
1.- Create a new .dox file. First we need to create a new .dox file at the module developing path /opals/$ModuleName/doc. In that directory we create a file $ModuleName.dox in which we write the module documentation according to the syntax that we use in a .dox file. The following screenshot shows an example of doc directory structure. The file $ModuleNameParams.dox is autocreated after we "compile" the $ModuleName.dox file. The process to create html files from a .dox file and release it will be described in next paragraph also.
2.- How to include the .dox to OPALS manual To include the .dox file that already described on the previous point we have to append the file $ModuleName.dox according to the section which fits the corresponding module. The $ModuleName.dox has to be appended in that file : ref_modules.dox We have to keep the syntax of the ref_modules.dox so the module will be added without any errors
3.- Compile the .dox Files To compile the whole documentation we have to execute the command doxygen from Command promt in this path :
D:\swdvlp64\opals\doc
After the compile step the documentation will be avaible to preview at this link : file:///D:/swdvlp64/opals/doc/html/index.html After reviewing the result to be able to release the documentation we have to Commit the changes to the CVS server!!
In every documentation file there are examples so the user will be able to execute the examples and view the results as a first step for the module usage. These examples are executed as Unit Tests after the build process of every module In case that a Unit Test failed the author of the module will receive an error message via email and a non successful build waning will be received. A simple Unit Test or example is the following. To write a Unit test we use the following syntax.
\testcase  #With this prefix we open a testcase (anything behind a hashtag will be interpreted as comment)
  \testparam   #With this prefix we open test parameters
    @source strip11.laz  #In front of @source we deifne all the source files that the module want to use
    @target strip11.odm  #In front of @target we have to define the output files of the current module. All of them, the possible files that will be created
    @disable             #if this taget is set, the test will not be executed (useful for temporarily deactivating tests)
  @validate ODMReadAccess(target[0]) #optional python code for validating targets (see autobuild/validators/*.py for details). The validators names are
  \endtestparam #close prefix testparameters
  \code
    opalsImport -inFile strip11.laz  #The actual test command
  \endcode #close prefix code
\endtestcase #close prefix testcase
To test the Unit Test before the build system do, and test it for possible errors the following command has to be executed from the following path
D:\swdvlp64\autobuild\
And then we use the following command
autobuild opals.csv --platform=x64 --unittest -m /opals/$ModuleName
To view eny errors that occurred during the Unit Test execution a directory will be created in the following path, after the unit test execution.
D:\swdvlp64\opals\ZonalFit\doc\~run
In this directory there are two helpful files opalsErrors.log opalsErrors.xml. These files consists of any error's information that occurred during the unit test. Another useful file is placed in
D:\swdvlp64\opals\ZonalFit\doc\testing.log
To release a module to files have to be changed,two strings have to be appended on that files. The first file is
\swdvlp64\opals\distro\ModuleListDeveloper.txt
. In that file the module name have to be appended at the end of the file. As we can understand the module will be released as Developer mode, so the module will be available in house only to be tested. If the module name appended in file swdvlp64/opals/distro/ModuleRelease.txt then the module will be released. The next step is to append this string
\opals\ModuleName;*o;*;*o;;;;Author;;\opals\moduleBase
to the file
\swdvlp64\autobuild\autobuild.csv
It is suggested to release the module first in ModuleListDeveloper.txt to be tested first and after a testing period then the module will be ready to be released. After the first nightly build the module will be built and tested through this Test Unit(s), if any error occurred the author will receive an email according to the error.
 1.8.17