Technische Universität Wien
Orientation and Processing of Airborne Laser Scanning data
Department of Geodesy and Geoinformation - Research Groups Photogrammetry and Remote Sensing
When working with large data sets, it might get necessary to further parallelise processing apart from the module multithreading support. In opals, currently 4 concepts of different complexity are realised which can be controlled by the parameter distribute of the workflow scripts. In the following the different concepts, their complexity and activation procedure are described.
-distribute 1 or -distribute None -distribute <processCount> -distribute ipp controllers and engines can be found below. -distribute ippIn the following sections, each concept and its application is explained in detail. But first, to better understand the different aspects of parallelisation, the differences between multithreading and multi(core)processing are discussed.
There are a few key differences between multiprocessing and multithreading. A process can be imagined as an execution unit of a whole program while threads represent execution units/segments of a process. Processes are independent of each other and have individual memory space allocated to them. Threads on the other hand share memory.
Multithreading and multiprocessing have different applications in the opals framework. A classic example of multiprocessing would be the usage Module Import to import multiple strips into multiple ODM files. As each of the Module Import instances can be run individually, using multiple processes will enhance the computational speed. An example of multithreading on the other hand would be a "divide and conquer" approach to writing a raster file, which can be divided into smaller tiles. Those are then handled by different threads and later combined into the finished raster file.
Though theoretical speedup of a program using techniques involving multiprocessing is given by Amdahl's Law, in reality there are other factors that limit the maximum possible speedup. In opals scripts like the package opalsQuality for example, certain parts of the script need to be finished before others can start running which of course leads to larger runtimes. There is also some overhead of the Python multiprocessing framework which can't be avoided and has to be taken into account.
As explained above, this is the standard processing mode when running an opals workflow script. When computing, one core of the computer where the script is run is utilised. Each module call within the script is executed sequentially, i.e. one after the other. As this is quite inefficient when working with modern computers with 8+ cores, utilising concepts 2-4 is recommended to achieve shorter runtimes through the optimal usage of the recourses available
In case there computations are run on a single computer but multiple cores should be utilised, multi core processing is the right choice.. If you want to run the script _grid.py using 6 processes for example, you can do so by setting the -distribute parameter to 6. E.g. for the demo data:
The runtime of this particular call will be about 3.5 times faster than when using the standard distribute value 1. The speedup can of course vary, depending on the hardware you are using.
Though you can choose the value of -distribute freely, it does not make sense to choose a value higher than the number of cores your computer has. In most cases, choosing a value higher than the amount of cores will impact the runtime in a negative way. For most opals scripts, a good value for the number of processes is the number of input files you have (again, keeping your number of cores in mind). Running the above example of _grid.py with more than 6 processes does not increase the speedup as for this script, there are only n different tasks to be performed at once, n being the number of input files.
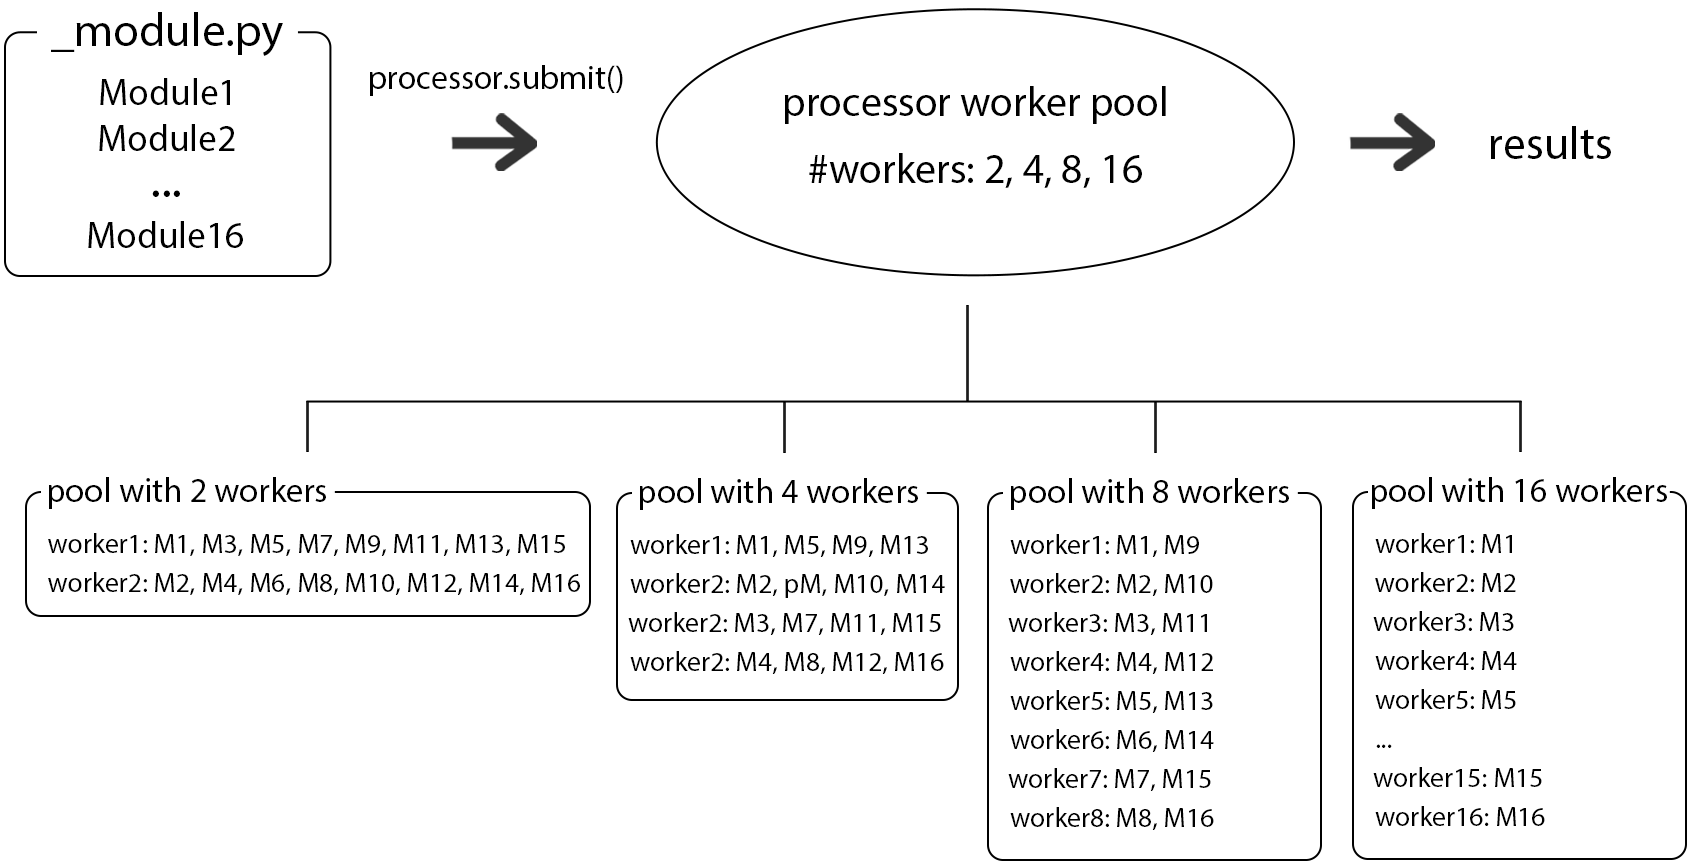
A schematic represenation of a distribution of module runs using different numbers of workers/processes can be seen in Fig.1.
As said in the opening paragraph, not only the number of processes can be chosen but also the number of threads that a program uses. The number of threads is controlled by the common parameter nbThreads and can be set in the .cfg file like so (excerpt of the cfg File of opalsQuality):
To give an idea of the magnitude of speedup achievable, different combinations of numbers of processes/threads were tested on the script _grid.py and the results depicted below in Fig.2. The demo dataset Loosdorf (To be integrated as a usecase example) containing 12 strips was used as the input. The numbers of processes (i.e. the value of the parameter -distribute) were [1,2,4,8,12]. For each configuration, each of the following number of threads was used to run _grid.py: [1,2,4,8,16,32]. The computer which was used to run these tests has 16 Cores and 32 Threads.
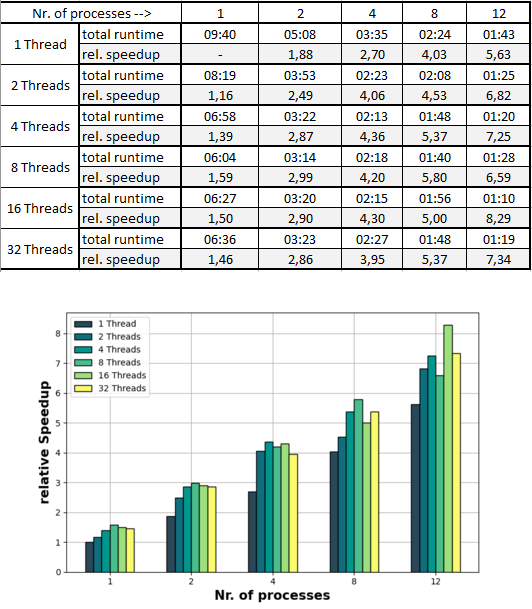
In order to interpret these results it is important to note that 2 runtimes of one and the same configuration can differ by up to 10-20 seconds. Having said that, for this dataset an increase of the number of processes is beneficial for decreasing the runtime in all of the configurations. Regarding the number of threads however, such a statement can not be made so easily. Increasing the number of threads to up to 4 is decreasing the runtime 100% of the time, when using 8 or more threads it is not as clear. While the general trend is indicating more threads --> more speedup, there are cases where using more threads actually slows down the program. This is due to the above described shared memory space between the threads that is not the case when using multiple processes. It can happen that the different threads (while they do each have to handle less workload) get in each other's way and perform worse as when there are less threads.
The main takeaway of the table in Fig.2 would be that an increase of the number of processes is in most cases a good idea in order to speedup your program (again keeping the specs of your hardware in mind). One should on the other hand be more careful about increasing the number of threads. The speedup may also be limited by the type of data drive that you are using, a HHD (Hard Disk Drive) or an SSD (Solid State Disk) which can operate much faster. Additional processes are typically more demanding on the physical drive (RAM) of your computer than additional threads. So the amount of RAM available to you is something to keep in mind as it can can also be a bottleneck for increasing the runtime of your program.
The instantation of a multiprocessor object is normally done by helper scripts analyzing the input argument -distribute. It can however very easily be instantiated and used in your own scripts. This example is supposed to showcase how the multiprocessor in the opals framework works and display the most important functions used by scripts like opalsQuality. Another purpose of the script is to demonstrate that using multiprocessing does not prevent queries on modules after they finished like you would when using .run() to run a module.
For more information about the member functions of the multiprocess class please visit the multiprocess Class Reference.
When processing large projects and have multiple machines available for processing it makes sense to be able to use said machines. With the above described form of multiprocessing this is not possible, which is why a third processing option for the -distribute parameter was implemented, namely ipp. ipp is short for ipyparallel, a framework for parallel computing.
To use ipyparallel and the distribute option ipp, ipyparallel needs to be installed.
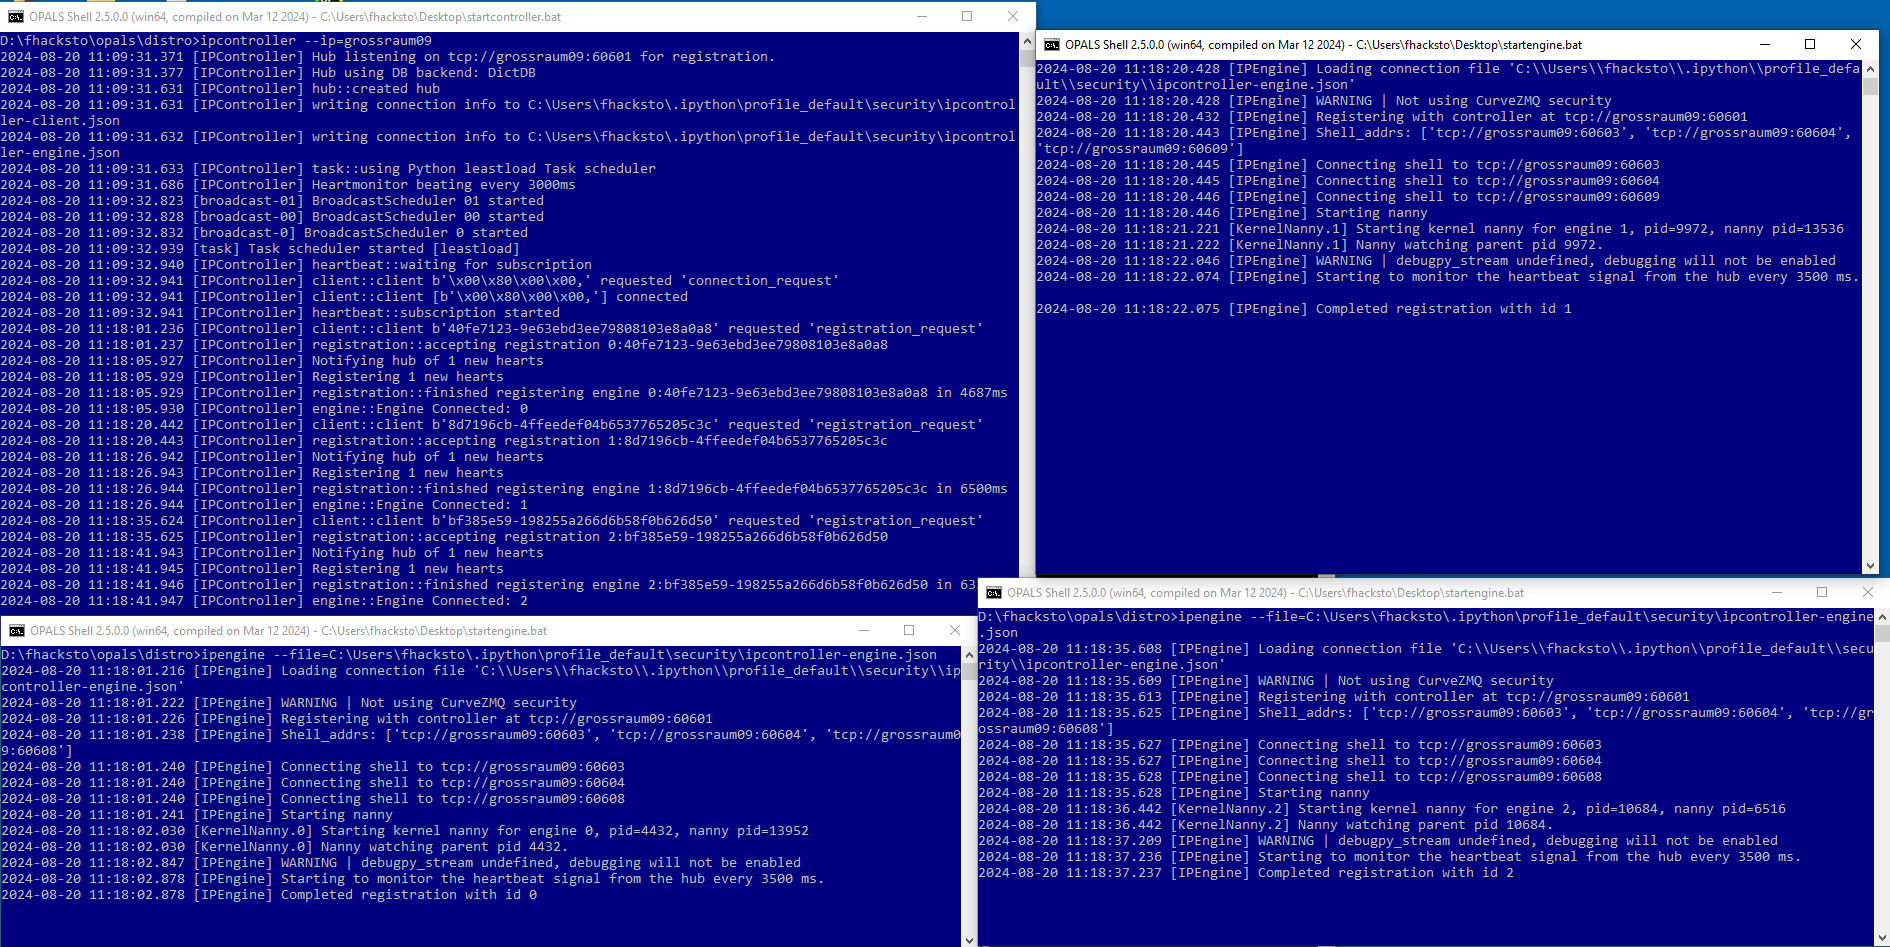
First, a so called ipcontroller is started using the following command, inserting the ip address of one's machine.
This creates several folders and files in the local user directory. Engines (workers) can then be started using a .json file, located at C:\Users\USER%\.ipython\profile_default\security. In a seperate shell (or multiple), execute the following command.
Doing this 3 times using 3 different opals shells results in 3 engines (workers) that can execute tasks (see Figure 3). Provided they can communicate via ssh, engines can be started on different machines using the same .json file. The file obviously has to be accesible to all machines, so it can either can be copied to the machines individually or copied to a shared network and accessed that way.
Now that the controller and engines are set up, an opals workflow script where ipp is implemented can be called and the tasks are distributed to those engines when the input parameter and argument -distribute and ipp, respectively are set.
Since the computations in concept 3 are done via a shared network and not locally, this can quickly become a bottleneck. This problem is addressed in Concept 4.
As explained in the paragraph above, when computing on multiple machines, the full local computing power should be used. Therefore in concept 4, the input files of a certain processing unit are copied from (e.g.) a server into a temp directory of the machine to which a certain task is assigned to, then computations are run locally and in the end the output files are copied back to the server. In opals, opalsTask was implemented to handle the above described process of creating temp directories and copying files in the background. For more details, please see the documentation for opalsTask. opalsTask is not something that is (de-)activated with a script parameter, but rather a script property, i.e. if opalsTask is used to define the tasks that are needed for a certain workflow. The only difference between concept 4 and concept 3 is the ability to compute the tasks locally instead of on a shared network.
opalsTask is currently realised in the following scritps:
So far we have only talked about OPALS modules such as opalsInfo and opalsImport as input for the processor, be it in single, multicore or multimachine processing mode. These OPALS modules can be submitted directly to the processor or multiple modules can firstly be gathered together to form an opalsTask, which can then in turn be submitted to the processor. However, also more complex structures can be processed in parallel, in the form of so called "Python Modules".
For different reason, it can be desired to not submit modules or tasks but instead wrap the modules in python code, which can then be submitted. As seen in the example below, there are two things, that need to be taken care of in order for it to work.
Firstly, the processor needs to recognize the code as a "Python Module".
 1.8.17