Technische Universität Wien
Orientation and Processing of Airborne Laser Scanning data
Department of Geodesy and Geoinformation - Research Groups Photogrammetry and Remote Sensing
This tutorial gives a brief overview of using OPALS. In a 15 minutes quick tour you will learn some basics about OPALS modules and their parameters and, finally, how to read ALS point cloud data, interpolate a Digital Surface Model (DSM) and derive a color coded raster map of the DSM. The ALS data used in this tutorial are located in directory demo.
For a more detailed description of the underlying concept, please refer to Section Software Concept.
OPALS stands for Orientation and Processing of Airborne Laser Scanning data. It is a modular program system consisting of small, well defined components referred to as 'modules'. Each module is accessible in three different ways:
Modern ALS sensors provide a huge amount of data (several Mio. points per km²). Thus, efficient management of point cloud data is a precondition for sucessful processing of ALS projects. Within OPALS, the administration of point and line related geometries is based on the OPALS Datamanager (ODM). The ODM acts as a spatial cache and features:
For a detailed description of the ODM, please refer to Sections OPALS Software Concept and OPALS Datamanager.
The primary aim of OPALS is to provide an automatic processing chain for ALS data. Each OPALS module represents a small individual component within the overall process. In the majority of cases, the results of one module serve as input for the next module and so on. Thus, almost all OPALS modules provide input and output parameters (typically: inFile, iFormat, outFile, oFormat). Additional parameters either control the specific structure of the module output (e.g. gridSize, cellSize, tilesize for gridding/rasterization operations) or determine the processing behaviour (interpolation (method), neighbours (count) or searchRadius (for data selection), ...).
Each parameter belongs to one of the following classes:
One of the main benefits of OPALS is, that each module is available in three different implementations (commandline executable, python module, C++ class). However, calling the modules and specifying the parameters is slightly different for each variant. Therefore, the next section describes how to handle the different module implementations by means of a simple example.
For the derivation of color coded raster map of a digital surface model, first, the raw ALS point cloud is read into the OPALS Datamanager (ODM). Subsequently, the surface model is interpolated using a simple interpolation method on the basis of the ODM. Finally, the resulting surface grid model is analysed and a colour coded raster map is derived by applying a colour table depending on the DSM heights. Thus, this rather simple task can be split up into three modules:
The most straightforward way to use OPALS is to execute the command line programs from within a DOS/unix shell. Thus, first start a shell window and change into the proper directory containing the test data (demo).
To print a list of short usage examples, type:
Each module presents a usage screen in case the -help parameter is specified. E.g. for Module Import the command:
will show the following usage screen.
The usage screen contains a list of all module specific parameters (options) together with the respective data types and a short description. If available, default values are printed in parentheses (eg. default tilePointCount = 200.000). Parameters, whose values can be estimated are marked with =estim (e.g. -iFormat) and optional parameters with =skip (e.g. -filter).
Alternatively you can open the reference documentation of the module in the standard browser by typing
or as Compressed HTML Help containing a full-text search using the following command
Note: In case you have problems viewing the Compressed HTML Help (CHM) in Windows 7, open the file properties of $OPALS_ROOT/doc/opals.chm and click on the Unblock button.
To get a list of the parameters common to all modules, type:
The following screen will appear:
To get detailed help for a specific parameter (e.g. inFile), type:
or
The follwoing detailed description of the parameter inFile together with a general description of the underlying data type (Vector<Path>) will show up:
The only mandatory parameter of Module Import is –inFile specifying the input data sources. Please note, that parameters can also be specified using single hyphens (-inFile), they are parsed case-insensitive (-inFile=-infile) and abbreviations like -inf are allowed. Although abbreviations are allowed, intermediate letters must not be omitted. Thus, the command:
will provoke the following error message:
-iFormat and -outFile are examples for parameters, whose values can be estimated. In case of -iFormat, the input file format is determined heuristically by analyzing the first few bytes of the data file. If no output file name is specified, the name of the resulting OPALS Datamanager file is constructed using the path and name of the input file and replacing the extension by '.odm' being the default extension of OPALS Datamanager files.
Thus, a short and valid command for importing the point cloud of ALS strip 11 is:
The file strip11.laz is automatically recognized as an ASPRS LAS file indicated by the log message (laz is the compressed version of las):
Module Import accepts multiple input files as indicated by the container type vector<Path> of parameter -inFile. The data of all input files are merged into a single ODM file. In order to load the points of all ALS strips into a single datamanager file (alsPoints.odm), either specify multiple file paths separated by blanks, following the -inFile parameter:
or repeatedly specify parameter -inFile, followed by a single file path for each strip point file.
The following pair of files is created during data import:
The OPALS Datamanager file (.odm) contains both, the actual coordinates and all attributes of the point data.
Furthermore, Module Import offers a series of additional parameters for controlling data import (filter, tilePointCount, tileSiz, storeOrder, ...) but all of them are optional. They are described in detail in Section Module Import.
Once the data are successfully loaded into the ODM, we are ready to interpolate a DSM with Module Grid. opalsGrid offers simple interpolation methods like nearest neighbour or moving planes interpolation to quickly create surface grid models. OPALS uses the GDAL - GeoData Abstraction Library for accessing grid/raster models. Thus, the whole variety of GDAL supported data formats (GeoTiff, ESRI ASCII Grid, USGS DEM, DTED, ...) is provided by Module Grid. Again, a usage screen is offered when executing opalsGrid with the -help or even without any further parameter.
As for Module Import, the only mandatory parameter is the input file name (i.e. the ODM file name in this case). All other parameters are either estimable, optional or dedicated default values are available. Thus, a DSM can simply be created using the following command:
This results in a DSM in GeoTiff format (indicated by the .tif extension) with 1m resolution (=default gridSize). Since the interpolation method was not specified explicitely, the default snap interpolation was used. This is the fastest but poorest interpolation method: The ODM point cloud is traversed and the respective grid cell is determined for each ALS point, and the height of the point is mapped to the cell. Subsequent ALS points belonging to the same cell area override the grid cell height. Thus, the snap method is good in case the input points are already in regular structure (some ALS data vendors deliver a raster rather than the original point recordings) but disadvantageous otherwise. To obtain smoother results, we can specify a suitable interpolation method like movingPlanes. If we enter the command...
.. we will get confronted with the following error message:
What was wrong? There are two interpolation methods starting with 'moving' (movingAverage and movingPlanes). Thus, the entered abbreviation does not uniquely specify one of the available parameters as indicated by the error message above. The correct command (using movingPlanes interpolation) is:
Module Grid offers many more parameters to control the gridding process, like grid cell size (-gridSize), the number of neighbouring points used for grid point interpolation ( -neighbours), a maximum search radius for neighbouring points (-searchRadius), etc. All these additional parameters can be specified in one long parameter list, like:
However, it is also possible to prepare the parameters on a configuration file, which is especially useful, when surface models have to be calculated for multiple data sets (e.g. multiple ALS strips) in the same way. The simplest way is to create a file named opals.cfg in the current working directory and enter all common calculation parameters in parameter=value syntax. If we create a opals.cfg file with the following contents ...
... we can achieve the same result as in the example above by simply typing:
As mentioned above, the use of cfg files allow processing multiple data sets using the same calculation parameters. Thus, to create three separate strip DSMs, we can simply write:
Please note, that the point data (LAS files) of strip 21 and 31 have to be imported into the ODM prior to calling opalsGrid.
If you have tried out all the stated commands, you should find (at least) the following DSM grid files in the demo directory:
All these grid files are GeoTiff rasters containing a single 32-bit-float raster band (the geo-referencing is stored in the header of the Tiff file as well as in the respective .tfw files). Opening the dsm.tif file with an image viewer like IrfanView you should get an image like this:
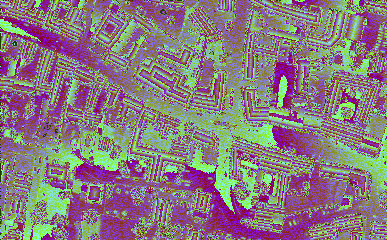
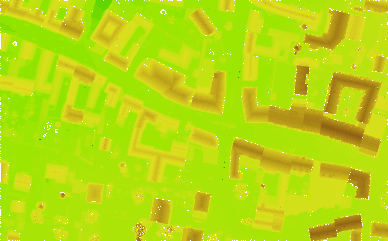
Since the grid file contains the DSM heights as 32-bit float values, the image looks a bit strange. When using a GIS viewer, like QGIS, we can easily get e.g. a greyscale representation of the DSM. However, OPALS provides Module ZColor to create color coded raster maps (8-bit palette files). Z-colouring is basically a classification task. The translation of height values to colour classes is controlled by palette files. If no specific palette file is at hand, the built-in 'green-yellow-brown' palette is automatically used. The command:
produces the color coded raster map file dsm_zco.tif (GeoTiff) with 50 different height (=colour) classes. The result looks like this:
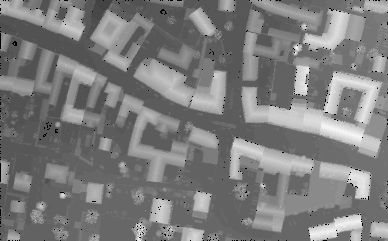
If we prefer a greyscale representation of the DSM, we simply have to use the following predefined palette file (greyPal.xml) in XML syntax:
Now, we can create the height dependent greyscale map by typing:
Please note, that $OPALS_ROOT/addons/pal denotes the default palette file direcory of the OPALS distribution. Since all palette files are searched for in the current working directory and in the default palette file folder (in exactely this order) we can simply write:
We get the following result:
For more details, please refer to Module ZColor.
The main advantage of using the OPALS command line executables is that they are fully self contained i.e. no other software needs to be installed in order to run the OPALS command line executables. However, there are also a series of disadvantages like limited error handling and scripting possibilities.
Python, instead, is a scripting as well as a full featured object-oriented programming language. Since every OPALS module is available as a python module, OPALS functionality can easily be integrated in the Python environment. OPALS modules can be invoked interactively within the Python shell or even embedded in Python scripts or programs. The following subsection describes how to load and execute OPALS modules within the Python shell. The details about embedding OPALS modules in Python scripts or programs are explained in Sections Workflow Management with OPALS and Using Python Bindings.
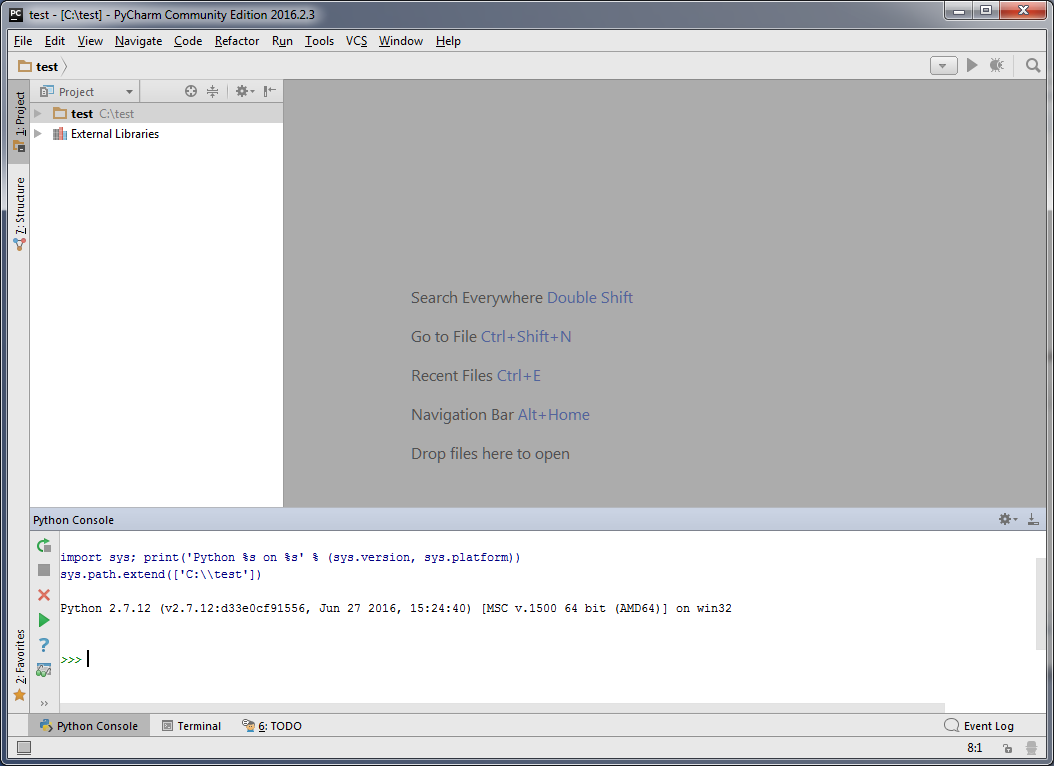
Assuming that you have not configured your OPALS installation to use an external Python interpreter (see Installation Guide), you can start an interactive Python shell e.g. in the following ways:
python in an OPALS shell$OPALS_ROOT/opals/python.exeHowever, there are enhanced Python shells available, which provide useful features like code completion, syntax highlighting, and call tips. OPALS has an addon for the Python integrated development environment (IDE) PyCharm which, among other things, features such an interactive shell. This addon has to be downloaded from the Downloads section individually. Double-clicking on $OPALS_ROOT/addons/PyCharm/startPyCharm[.bat|.sh] opens up this IDE, where you can choose to open an exisiting project or to create a new one. For details on the first time startup, refer to First time start of PyCharm . In the main window, you can open the interactive shell at the bottom by pressing the "Python Console" button.
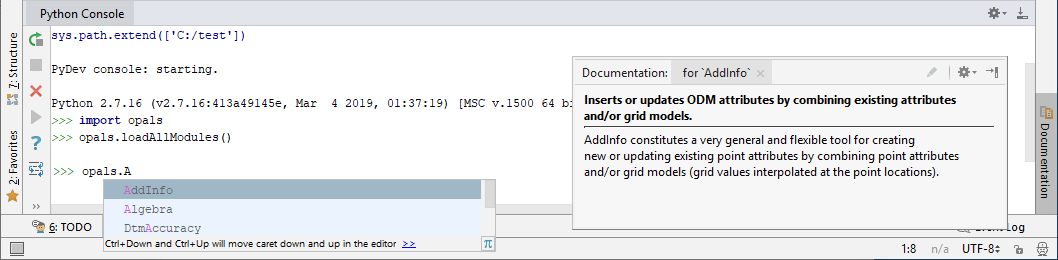
To import ALS data files into the ODM within Python, just as in the previous subsection using the command line executables, the following steps are necessary. First, we have to make the respective OPALS module available. opals is the name of the Python package containing all available OPALS modules. Using PyCharm's tooltip feature, the list of available OPALS modules can be displayed by typing:
The following tooltip window appears:
Before starting with the actual example, we must change into the proper working directory. Within a Python shell this can be done using chdir from the built-in python module os.
To import the ALS point cloud data into the ODM, we first have to create a Module Import object. Let's call the import object imp.
The next step is to specify the program parameters, but how? Again, the PyScripter tooltip feature is valuable to get an overview about the available methods of the Module Import module. Simply type ...
... and the list of available methods is displayed as a list in a tooltip. Besides that list, the documentation string of the currently selected method can be displayed by pressing Ctrl-Q. You can see by scrolling through the list that each parameter can be accessed via it's name as a python property. (see properties). For example, to set/get the input file name (which is the only mandatory parameter of Module Import), the following code snippet is sufficient:
Thus, to set the input file name, select inFile from the list. Typing characters into the shell restricts the entries in the tooltip's list to those methods that start with or contain the characters typed so far. Thus, you may first type in a few characters until only a few items are left in the list:

The method's tooltip (opened by pressing Ctrl-Q) also informs about the required argument(s) and the(ir) respective internal data type(s). As the internal container type ('Vector') is represented as a list in Python (see Data type mapping), we can specify a Python list of opals::Path (i.e. a string representing a file path). Our Module Import object is told to import the three ALS strip LAS files contained in the demo directory into a new ODM using the following Python command:
Finally, to start data import, type:
Each OPALS python module provides the run() method in order to start the actual processing. So we can summarise that the general sequence for running an OPALS module within Python is:
import the OPALS modulerun() methodAccording to this general sequence, the entire process of loading ALS data, calculating the DSM and deriving the height (height dependent) greyscale raster map requires the following python commands:
Please note that the calculation parameters for the grid inpolation (grid size, nr. of neighbours, etc.) are read from opals.cfg, if available (see Specification of Parameters in Configuration Files). Furthermore, the creation of the greyscale raster map relies on the palette file greyPalette.xml as explained in the previous subsection.
As an alternative to setting parameter values one-by-one using the respective methods, opals Python modules may be instantiated with parameter values as arguments, allowing for most compact code. Thus, the above code is equivalent to the following:
For more details concerning OPALS Python bindings, please refer to Using Python Bindings. For instructions on how to debug Python scripts, see Debugging OPALS Python scripts.
Each OPALS module is alo available as a C++ class via DLL linkage. Using the C++ bindings requires solid knowledge about the object-oriented programming language C++ and is only recommended for expert users. However, the C++ bindings offer highest performance and flexibility.
The following subsection demonstrates how to write a very simple C++ program covering the functionality of the above example. Please note, that mandatory preconditions like the availability of a C++ compiler and the necessary customisation steps (include directories, library directories, etc.) are not covered here.
Please note, that names of the module related methods are the same as for Python (e.g. run(), reset()). Setting and querying parameters in Python is achieved via parameters (e.g. imp.inFile = '/path/to/file'), however. The above example additionally demonstrates the general error handling concept of OPALS via exceptions (which is also available for Python). For more information concerning the C++ bindings, please refer to Using C++ Bindings.
 1.8.17