Technische Universität Wien
Orientation and Processing of Airborne Laser Scanning data
Department of Geodesy and Geoinformation - Research Groups Photogrammetry and Remote Sensing
This tutorial introduces the concept of creating arbitrary workflows using either shell scripts, python scripts or C++ programs.
Due to the high amount of data provided by modern sensors, ALS data processing requires a high degree of automation. In general, similar calculation tasks are carried out for multiple processing units. Typically, a processing unit is either a single ALS strip (strip DSMs, relative strip differences ...) or a window (tile) of limited extension containing the combined ALS data of all ALS strips within the window (ALS filtering, DTM calculation ...).
Therefore, this tutorial focuses on the automation of data processing using scripts. A general understanding of how to use OPALS is a precondition. If necessary, please refer to Getting Started for basic information.
In the following subsections example scripts aiming at the derivation of relative strip differences are provided for each OPALS module implementation (command line executable, Python module, C++ class). For the sake of clarity, the scripts are kept very simple. Only a minimal set of input parameters is used and error handling is limited to a rudimentary level. So, please don't take them as examples for good programming style. Instead, real-world scripts should rather be more flexible concerning the parametrization and should provide more thorough parameter checks. The sample data used in the scripts can be found in directory $OPALS_ROOT/demo/.
For running the following script, it is necessary to generate a text file containing all strip filenames. E.g. for the demo data:
If we store the strip file list as striplist.txt and the example script as computeStripDiff.bat , we can simply run the script by typing:
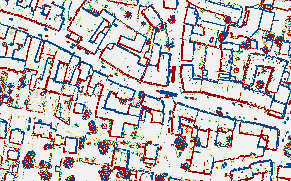
The script reads the names of the strip files from striplist.txt file, and for each strip it imports the data into the ODM (opalsImport), derives the strip boundary (opalsBounds), and calculates the surface model (opalsGrid). Furthermore the list of overlapping strip pairs is determined (opalsOverlap) and strip difference models are calculated for each overlapping strip pair. Finally, all strip difference models are merged into a single mosaic and a color coded visualization using the standard difference color palette is derived. The resulting color coded mosaic is shown in Fig. 1.
The above example reveals a series of organizational and syntactical drawbacks. Formulating loops, defining local variables, and passing parameters is not very elegant. The more, access to results is only possible via file interface and error handling relies on numerical return codes of the command line executables. Python, in contrary, is a full featured scripting and programming language offering a wide range of (built in) features. The very same example as above implemented as a Python script, would look like this (in python 3.x syntax):
Given the script is stored as stripDiff.py and the PATH , PYTHONPATH, and PATHEXT environment variables are set as described in the intallation manual, the same results as in the example above are obtained by typing:
From the pre-configured OPALS shell use the following command to start the script
Some remarks:
The script starts with the import of some general built-in python libraries, followed by the import and instantiation of the required OPALS modules
In the next step the built-in argument parser is initialized, the script options are parsed, and some local variables are defined.
In the next step, the actual strip files (command line argument -s) are assigned to the stripfiles variable and within a loop the strip data are imported, the strip boundaries are derived and DSMs are calculated.
The above code snippet shows an interesting and very useful feature. The output (=ODM) file of the data import, which has not been set explicitly but was automatically created by Module Import, is queried via the outFile property and stored in a list (for later use in the determination of the overlapping strip pairs). This provides a good way of chaining modules (output of 1st module = input of 2nd module, output of 2nd module = input of 3rd module...) without the need of setting the output files explicitly. This is even more useful, if the results of a module are not passed via files, but as custom object. This is, for instance, the case for Module Overlap :
Here, Module Overlap calculates all overlapping strip pairs according to the input list of strip boundary files (i.e. the underlying odm_files in this case). The resulting pair list can directly be queried after run() has been executed via the pairList property. In the subsequent lines, the strip pair list is traversed and all relevant difference models are calculated.
The above code also demonstrates the error handling capabilities. The OPALS error system mainly bases on exceptions which are fully integrated into the Python implementation. For the sake of clarity, the given example is very simple and shows only the basic usage of exceptions. The parameter setting and the run() function (comprising parameter checking and the actual module code) is executed within a try-except block. If an exception is thrown by the Module Diff module, it is caught by except. In this simple case, only the error message of the exception is output. However, in real world processing, more thorough examination of the error conditions would be necessary, eventually leading to re-running the module with different parameters.
Finally, the resulting difference models are merged together using Module Algebra and a color coded raster map of the resulting mosaic is derived with Module ZColor. The latter highlights the specific ways of setting different parameter types.
The parameters inFile and palFile are of type 'string'. Whereas the input file is set using the output of a previous module (as mentioned before), the palette file is passed as a literal constant. Please note the preceding r character before the actual string value. This is necessary to allow back slash directory delimiters which would, by default, be interpreted as escape characters. For more details, please refer to the reference manual. In the next statement the scale factor for the palette is set again as a string constant ( scalePal = "1"). This might appear strange at a first glance. However, since the underlying data type (opals::ZColorScalePal) is defined as a complex class allowing automatic and z-range scaling, we can not simply provide a (scalar) scale factor as we probably would expect. All of the following examples are valid statements for setting the palette scale:
... but ...
... would produce the following Python error:
Please note, that the same rule applies for all complex OPALS types (i.e. GridLimit, MultigridLimit, CellFeature...). Finally, setting the screen log level as zco.screenLogLevel = scrLogLevel is an example, how enumerators can be handled. The variable scrLogLevel has previously been defined as:
The data type LogLevel is an enumerator defined by OPALS containing the named constants error, warning, info, verbose and debug). All enumerators can be accessed by the type.value syntax. For more information about using the Python interface, please refer to the reference manual. For instructions on how to debug Python script, see Debugging OPALS Python scripts.
Small C++ programs for each Module can be found in the directory $OPALS_ROOT/c++_api/demo/ . demoImport.cpp, for example, is an exemplary program written in C++ that instantiates Module Import and imports a data set into an ODM:
Kindly note that the compiler's search path for C++ header files must contain the directory $OPALS_ROOT/c++_api/inc/opals/ . Furthermore, the linker must be set to link to opals_base.lib and the import libraries of any used modules (opalsImport.lib in the above example), found in $OPALS_ROOT/c++_api/lib/. For the Microsoft C/C++ Compiler is only necessary to append $OPALS_ROOT/c++_api/lib/ as additional library directory. All necessary libraries are then automatically linked. For debug configurations, it is necessary to the set the preprocessor macro /c OPALS_NO_DEBUG, forcing release libraries being used (debug libraries of OPALS are not included within the distribution). To run such a program, the operating system must be told where to find the shared libraries, which are located in $OPALS_ROOT/opals/opals/ .
OPALS is organized in packages each of which covering a specific topic (quality documentation, georeferencing, filtering, etc.). The packages consist of multiple modules and arbitrary work flows can be constructed by combining the respective modules using scripts. As a basic principle, the OPALS distribution provides one main Python script for each package. Package scripts, generally, take a list of data sets and carry out one or more specified tasks using certain calculation parameters. In this section, the overall organization and application of the package scripts is explained in detail.
The package scripts are provided as Python modules. The recommended way to execute the OPALS package scripts is from the OPALS shell, which sets up all necessary environment variables. Furthermore, the shell provides the OPALS script execution command opals.bat that allows to call the provided package scripts from any working directory simply by name. Note that opals.bat may as well be called when using a correctly configured external Python installation.
Without opals.bat, like for any Python script, one generally needs to call python followed by the absolute or relative script file path, including its file extension.
To invoke an OPALS package script simply by name as above (without parent directory and file extension), without prefixing the call with python, and without prefixing the call with opals.bat ,
$OPALS_ROOT/opals/workflows) in the PATH environment variable, PATHEXT environment variable, assoc .py=Python.File ftype Python.File=C:\Path\to\python.exe "%1" %* For further details please refer to the Installation manual.
As mentioned above, OPALS comes along with one main workflow script per package. This script can be seen as a central access point of execution. The workflow scripts are stored in the directory $OPALS_ROOT/opals/workflows and are named as the corresponding package (e.g. opalsQuality.py). The scripts are designed being called from the command line but also providing a convenient pythonic interfaces (for further details see Executing scripts within python).
Each main package script may consist (and invoke) sub-scripts (related to the package), which themselves can rely on basic scripts (available and useful for all scripts). Thus, the general script hierarchy is:
The package opalsQuality, for instance, consists of the following scripts:
If the preconditions mentioned above are met, Python scripts can be executed from within a command prompt window just like shell scripts (bat files) or executables. Each package (sub-)script provides a help screen informing about the options offered by the respective script. E.g., to get general help about the opalsQuality script, type:
... if running the pre-configured OPALS shell, or else:
The script responds with the following usage screen:
Since there are reasonable default values available for all options (except the input data), we can trigger a complete quality assessment for the data in the current working directory (f.i. $OPALS_ROOT/demo/) by typing:
This imports all LAS files (strip11[21][31].laz) into seperate ODMs, calculates surface models for each strip, derives relief maps (shaded and color coded), determines the strip boundaries and identifies the overlapping strip pairs. For the latter, strip difference models are calculated and color coded visualizations are derived (for each strip pair and as a mosaic). The precision of the relative strip orientation is analyzed via a Least-Squares-Matching (LSM) approach and finally, the ALS point density is checked and visualized. For details, please refer to the opalsQuality documentation.
Please note that if you are not running the OPALS shell and the PATHEXT environment variable does not contain .PY , it is nevertheless possible to run the package scripts from the command prompt. In this case, the Python interpreter must be invoked explicitly, with the package script as input parameter. From a command prompt within the demo directory, we can write:
However, it is strongly recommended to use the OPALS shell, as it is the safest way to start, both, OPALS command line modules and package scripts from within any working directory.
When you want to integrate a package scripts into our own python script, it is recommended to use the corresponding python interfaces. In a correctly set up OPALS python environment you can directly import the package script as shown below ($OPALS_ROOT/demo/opalsQualityDemo.py):
As for OPALS modules all script parameters can be set while instantiation or each parameter is explicitly set to the corresponding attribute of the object.
Usually, package scripts take a list of data files (i.e. ALS strip data or data tiles), perform a series of processing tasks using a set of calculation parameters, produce some intermediate products, and finally create the desired results. Since this general processing sequence can be applied to all package scripts, there is a list of standard parameters common to all scripts (as it is for opals modules abbreviation for parameters can be used when calling form the command line). These are:
Additional commonly used script parameters are:
Some packages (e.g. opalsQuality) provide a main package script which intensely uses sub-scripts. Above all, this is because the packages often feature many different aspects. In addition, it has always been good programming practice to split up larger tasks into smaller pieces. One good reason for doing so, is the clarity and readability of the code. Now, we are often facing the situation that what is an intermediate result for one script may be the basic input for the next. As an example, qltDSM generates surfaces models and its visualizations, and qltStripDiff relies on the surface models (but not on their visualizations). In short, the main package script may use and interact with multiple sub-scripts. Since each sub-script itself can be executed stand alone and, thus, has its own set of parameters (input files, output/temporary directory, cfg files, etc.) it is necessary for the main package script to provide a set of output directories (-o) and cfg files (-c). For this purpose, these parameters may be specified in the following way for the top-level package scripts:
sub-script=output dir for sub-script sub-script=cfg file for sub-script For each script, a default configuration file is available with the same name as the script itself and the extension .cfg . These default configuration files are located in the directory $OPALS_ROOT/cfg/. However, since each project may require different parameters, user defined configuration files are supported via the script parameter -c. Thus, it is good practice to copy the default configuration files, store them either on a global location if you always want to use the same user-defined cfg files or on project related location in case you want to adapt the parameters for each individual project.
The configuration files should contain all relevant calculation parameters for all incorporated OPALS modules. As a representative example the contents of the file qltStripDiff.cfg are listed below:
screenLogLevel=info

[opalsGrid]
gridSize=1
interpolation=movingPlanes
neighbours=8
searchRadius=5
selMode=nearest
filter=Echo[last]

[opalsBounds]
boundsType=convexHull

[opalsOverlap]
minArea=5%

[opalsAlgebra]
limit=union

[opalsZColor]
oFormat=GTiff
scalePal=0.04
palFile=$OPALS_ROOT/addons/pal/differencePal.xml
Package scripts, however, may call the same module via more than 1 subscript. If module calls via different subscripts shall use different parameters, then the corresponding module name in the configuration file must be prefixed with the corresponding subscript names, separated by a dot, as e.g. in:
Please note, that input (and output) files should strictly be passed as script parameters and not via the cfg files in order to avoid confusion. In case of doubt, the parameters passed as script arguments or those which are hard-coded in the scripts take precedence over the configuration file parameters.
Since version 2.6.0. script parameter can be set in the cfg file using sections. This can be useful when a parameter value is long and it is desired to "declutter" the command line call. Another use case for this would be if multiple calls of the same script are performed, changing parameters while others stay the same for all calls. Those can be set in the cfg files. An example of this can be seen in the documentation of the opalsQuality package script and is also shown below, using the example of the mask and slopeLimits parameter.
Although Python natively contain a simple graphically GUI providing rudimentary debugging possibilities, it is recommended to use one of the free Python IDEs described in the section below. Those are well suited for debugging and developing new scripts.
In general any Python Integrated Development Environments (IDE) can be used for script development within OPALS. Basically, its only necessary to start the IDE from the opalsShell (when using the internal python interpreter), to secure that the correct environment is set. Additionally, the OPALS Python interpreter has to be configured and selected within the IDE. To simplify matter, OPALS provides two IDE Packages that are fully preconfigured to collaborate with OPALS without installation. PyScripter is already integerated in the standard OPALS Windows packages, because of its small size. This IDE is the ideal choice for simple script analysis and debugging tasks. For serious script development (and for Linux users) PyCharm is recommended since it's a full featured IDE which contains auto-completing, code inspection and advanced debugging features. Because of its size, it's not included in the standard packages, but provided as separate download package on the download page.
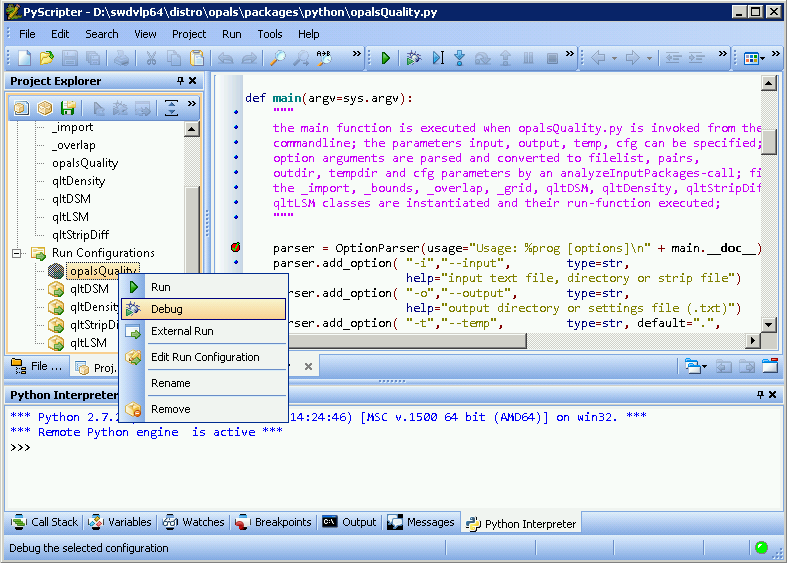
The Windows version of OPALS comes with PyScripter, a feature-rich but lightweight Python IDE (Alternatively, PyCharm can be used as high-end IDE available for Windows and Linux). Assuming that you have not configured your OPALS installation to use an external Python interpreter (see Installation Guide), you can start PyScripter by double-clicking on $OPALS_ROOT/addons/PyScripter/startPyScripter.bat. As mentioned in OPALS modules as Python modules, PyScripter offers an enhanced interactive Python shell. Among other things, PyScripter additionally allows for debugging Python scripts, and for organizing Python scripts in projects (file extension *.psproj). For each OPALS package script, there exists a PyScripter project file in $OPALS_ROOT/opals/workflows. Having started PyScripter, such a project file may be loaded via the menu Project, entry Open Project.... The Project Explorer on the left of the GUI then shows all Python scripts that belong to that project (node Files), which may be loaded into the editor by double-clicking on them. Furthermore, Project Explorer shows all configurations to execute those scripts (node Run Configurations). Right-clicking on one of those configurations and selecting Run executes the respective script with the according options.
To debug an OPALS package script, load the according PyScripter project file into PyScripter, and load the package script into the editor (by double-clicking on it in Project Explorer). At the position where you want the execution of the script to halt set a break point by clicking on one of the small, blue dots on the left side of the editor window, turning that blue dot into a red disk. Then, right-click on the configuration you want to run in Project Explorer, and select Debug. Now the according script is executed until it encounters the first break point.
You may proceed with execution step-by-step, using options found in menu Run:
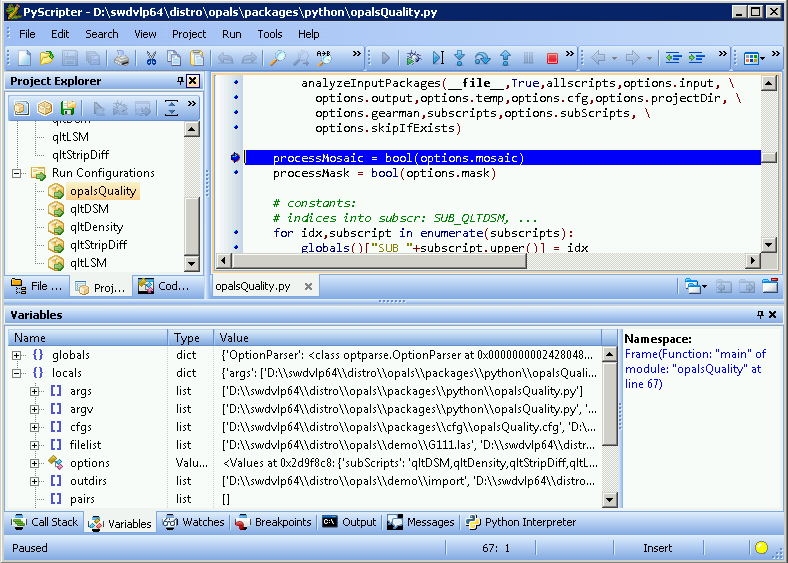
Whenever execution is halted, PyScripter allows for inspecting the currently defined variable names, their types and values:
Whereas Windows users only need to select the PyCharm installation option during setup, Linux users can get a pre-configured package of the free PyCharm Community Edition from the download page that needs to extracted into the $OPALS_ROOT directory by the following command
Compared to the original installation package the provided package
$OPALS_ROOT/addons/PyCharm/startPyCharm[.bat|.sh]) that runs PyCharm in the opals environmentDetails on PyCharm and its feature can be found here
Under Linux double-clicking on $OPALS_ROOT/addons/PyCharm/setupPyCharm.sh to once perform necessary setup steps (not needed under Windows since this is done by the setup). Then double-clicking on $OPALS_ROOT/addons/PyCharm/startPyCharm[.bat|.sh] to actually start PyCharm. The script does a few precondition checks and initializes the OPALS PyCharm environment. If an error occurs, the script stops with a corresponding error message (re-running $OPALS_ROOT/addons/PyCharm/setupPyCharm[.bat|.sh] with Administrator/root privileges may resolve the problem). Otherwise PyCharm is automatically started.
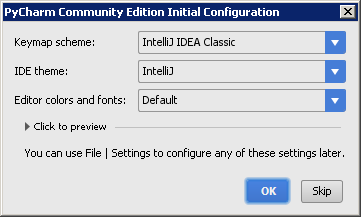
After the PyCharm splash screen you will need to accept the PyCharm Community Edition Privacy Policy Agreement to get to an initial configuration dialog.
Select your preferred setting (can be changed later as well) to get to the actual start-up window. Select 'Open' and choose the $OPALS_ROOT directory. The directory should show up with a slightly different directory icon, indicating that it contains a PyCharm project (The actual project files are stored in the $OPALS_ROOT/.idea/ directory. After the project is fully loaded PyCharm updates its indices and builds skeleton files in a background process which may take a minute or two (see status bar of the PyCharm window).

Although you can fully interact with PyCharm while the background process is running, the auto-completing feature will not fully work before the skeleton creation is finished.
PyCharm stores all settings in the user directory. Hence, it is possible to configure PyCharm differently for different users on the same computer. You will also recognise that PyCharm automatically restores the last project at start-up.
Once the opals project is loaded you should see a similar window as shown below. Left to the Editor Window, the Project Tool Window is displayed. There, if unfolded, the OPALS directory tree and all python files are visible. PyCharm supports multiple configurations for debugging and running python scripts. On the right side of the Navigation Bar (between Menu and Editor) existing configurations can be selected and administrated (by choosing Edit Configurations...). As shown below, activate the opalsQuality: OPALS quality package script configuration to testwise debug the opalsQuality script.
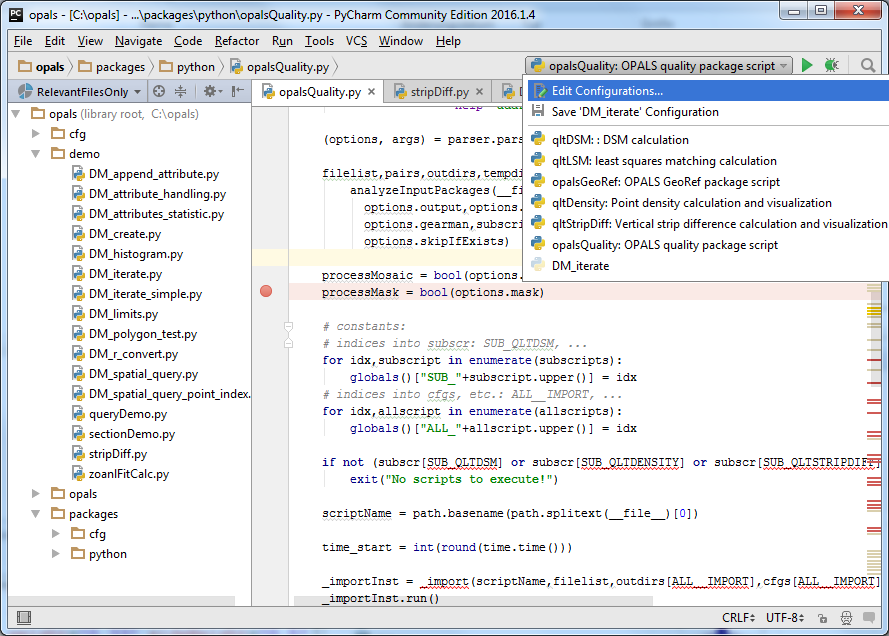
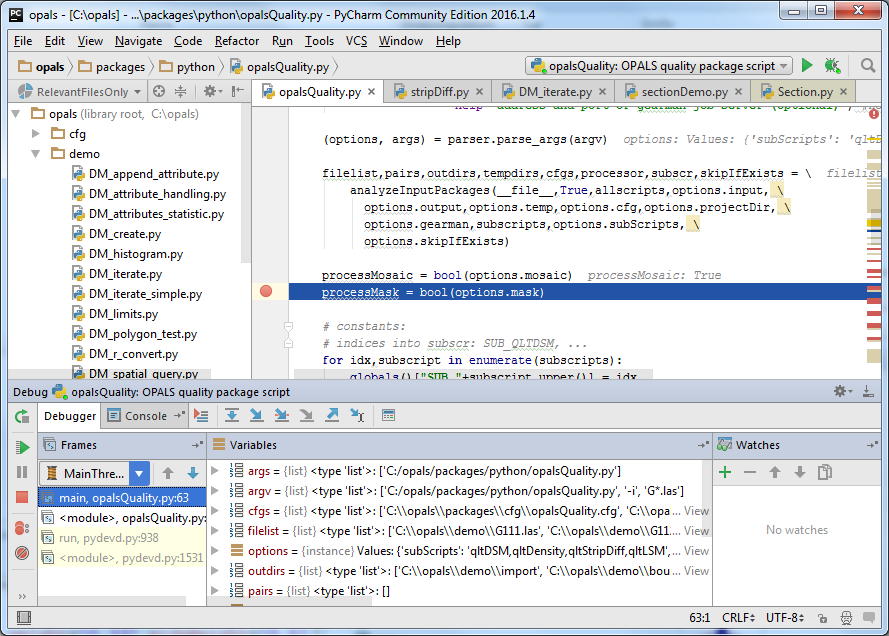
Click on the bug icon next to the configuration selection for debugging the opalsQuality script. The script is executed in the $OPALS_ROOT/demo/ directory with the parameters -i G*.las set (Menu Run/Edit Configurations... also allows checking the configuration setting). PyCharm should stop the execution at the pre-defined break point as shown below. Break points can easily be set/unset by clicking in the grey bar left of the Editor Window, using the Menu Run/Toggle Line Breakpoint or the corresponding shortcut key (visible right of the corresponding menu entry).
You may proceed with execution step-by-step, using options found in menu Run:
Whenever execution is halted, PyCharm shows currently defined variable names, their types and values in the Variables Window (centre window of the debug docker tool window). Additionally, the Watches Window allows further inspecting specific elements, attributes and functions of variables and objects. Left of the Variables Window, PyCharm displays the call stack in the Frames Window.
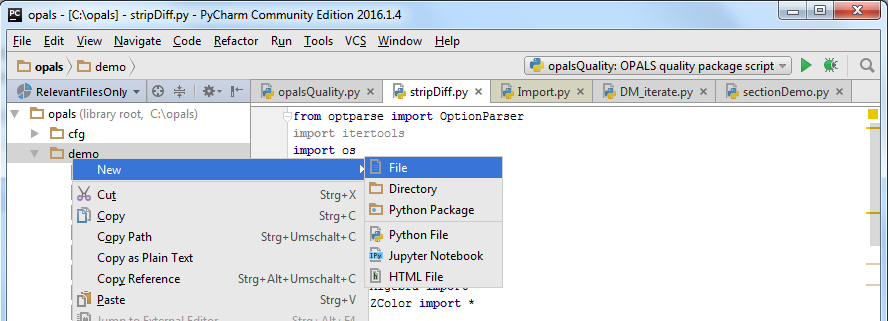
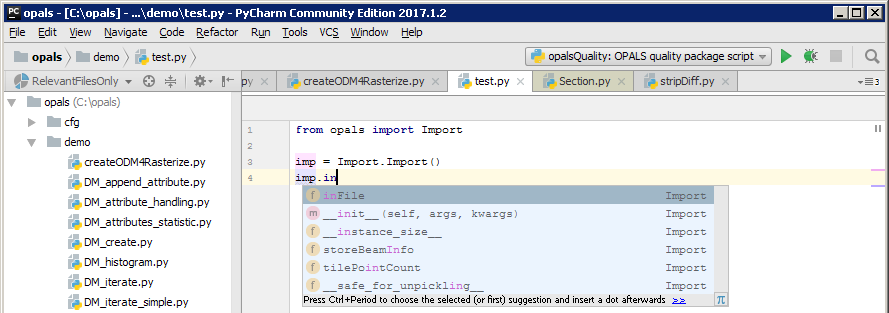
Auto-completing increases the development efficiency specially when programming with unknown (or not well-known) tools or libraries. There, the code editor suggests possible inputs based on the current context. For testing this feature, create a new python file by right clicking on the opals/demo directory and selecting the corresponding context menu entries as shown below. Call the new file e.g. test.py.
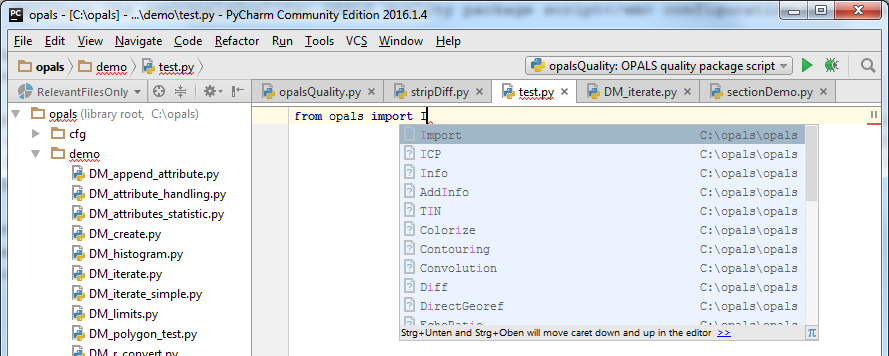
While typing from opals import I... PyCharm automatically shows a context menus with possible input values. If e.g. an Import module is instantiated (imp = Import.Import()), PyCharm suggest possible member functions if the variable imp is used. PyCharm not only displays member function of the current class (Import) but also of it base classes (Base) as it can be seen below.
PyCharm uses static code analysis for error detection and auto-completing. For completeness it is mentioned that python is a type-unsafe programming language, PyCharm does not always know the type of variable and hence, auto-completing doesn't work correctly in all cases.
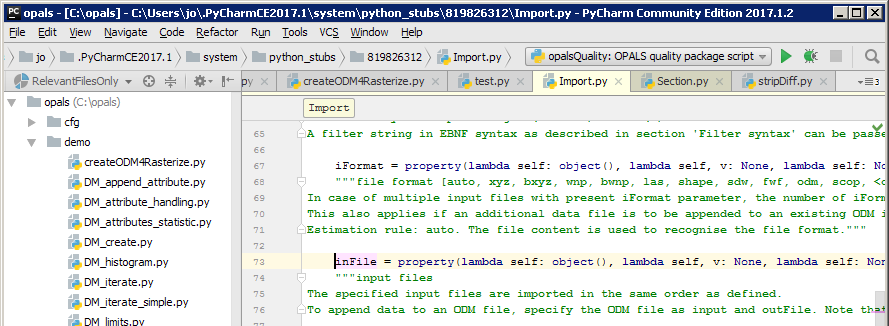
Another useful feature is to directly jump to the definition of a selected code. Test this feature, by typing imp.inFile, marking inFile and pressing <F12> (or <Ctrl+B>). PyCharm will jump (Menu Navigate) to the declaration in the corresponding skeleton file of Module Import, as shown below. There, you will find the function documentation and the expect parameters and types. You can also <Ctrl+Left Click> on the word inFile
This was just an excerpt of useful PyCharm features. Please refer to the comprehensive PyCharm help for further details.
 1.8.17