Technische Universität Wien
Orientation and Processing of Airborne Laser Scanning data
Department of Geodesy and Geoinformation - Research Groups Photogrammetry and Remote Sensing
qpals, an acronym of the open-source GIS QGIS (former Quantum GIS) and OPALS, is a plugin which allows interactive processing using OPALS modules from within the QGIS environment.
Contrary to OPALS, qpals is licensed under the GPL 3. This is required by QGIS, which is also licensed under the GPL. To allow OPALS and QGIS to work together, they run seperated from each other, exchanging information via the file system and stdin/stdout/stderr only. Because of this limitation, qpals cannot make use of the Python Bindings of the OPALS Datamanager Library.
Also, the plugin is written in python, but cannot use the python bindings of the OPALS modules. Instead, they are called as seperate processes using python's subprocess module.
Two different versions of qpals are provided: a nightly build with the lastest features, and a stable version. Old versions (up to Dec 2017) of qpals run in QGIS versions from 2.8 to 2.18. Since qpals Version 1.6, development has switched to python3. Newer features are only available for QGIS 3.x.
For reliable use, the stable version is suggested, as the nightly build might contain unfinished features and may crash QGIS. To use the nightly build, also make sure to use the lastest OPALS nightly build, as qpals may rely on features that have not been published as stable yet.
Please also make sure that your QGIS is installed in a path without any spaces, otherwise you will encounter issues during installation.
If any required packages are not installed in your QGIS-python environment, you will be prompted to do so on plugin loading and every time QGIS starts. Please be patient during the installation and ensure an internet connection for the package download. Currently, qpals uses the following packages that might not be included:
vispy (fast OpenGL visualisation)scipy (for grid interpolation)If the automatic installation fails, you can try a manual installation by staring the python-qgis.bat (or python-qgis-ltr.bat) file in the QGIS installation and entering the following command:
The stable version is hosted with the QGIS plugin repository. It can be installed directly from there by opening QGIS and navigating to Plugins - Manage and Install Plugins. Install qpals by using the search bar on top of the window, and typing "qpals". The Plugin Manager will download and install the plugin for you. When activated for the first time, qpals will ask for an OPALS installation path to use. Please select the folder containing the opalsXXX.exe - executables (i.e., not the folder containing the opalsShell.bat, but the subfolder "opals"). If set correctly, qpals will remember the OPALS installation for all projects. You can change it later in the Settings menu.
There are two possible ways to install the nightly build:
qpals-nightly.zip from the download page or directly from here. Extract it to your plugin folder (typically C:\Users\...\.qgis2\python\plugins\) and mark it as active in the Installed tab of the QGIS plugin manager (Plugins - Manage and Install Plugins).Plugins - Manage and Install Plugins in the Settings tab. Press "Edit", insert a name and the URL. The "qpals-nightly"-plugin should appear in the "All Plugins" tab after reloading the package sources. It can be installed like the stable version, see above.qpals is currently only available for MS Windows!
When creating/running a portable Version of QGIS, qpals will fail when the path to QGIS contains spaces. In this case, please copy QGIS to a path that does not contain any spaces and run from there. Similar behaviour may be observed with running QGIS from network paths.
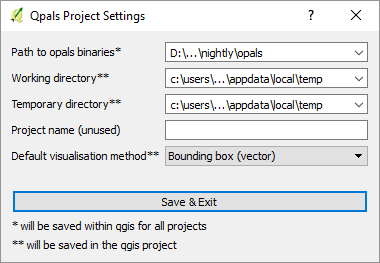
When loaded for the first time, qpals will prompt you to set a path to the OPALS binaries. Please select the folder containing the opalsXXX.exe - executables. This opals installation will be used for all processing within qpals.
To change the installation at a later point, navigate to the qpals-Project settings menu. Additional settings are a working directory where the opals modules will be executed in; and a temporary directory, where e.g. visualisations of the ODM are stored. Both of those folders should be writable by the user running QGIS. Those settings are saved within the QGIS project (.qgs) and will be reset to a system default for any new project. The same is true for the default visualisation method (important for the Module selector). The project name is currently not used or saved and can be left empty.
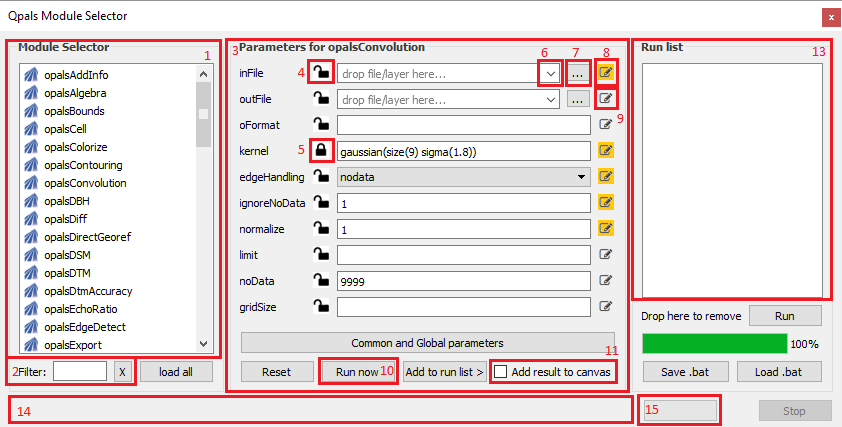
A very generic approach to representing OPALS modules in a GUI is the module selector. It allows running individual modules which can be selected from a list (1). The list can be filtered (2). Upon selection, the available options as well as default values and mandatory input is shown (3). For parameters that contain paths, drag & drop from both the layer list in QGIS and a file browser (6) is supported. Also, an "Open File" dialog is available (as indicated by the ellipsis) (7). To supply multiple files to a single parameter, holding down the [Ctrl]-Key while dropping the file will append it to the current content, seperating the entries by a semicolon (;). This is also the syntax to provide multiple values to any other vector parameter (e.g. limit xMin;yMin;xMax;yMax).
For every parameter, the help text can be shown by clicking the small icon on the right hand side (8,9). An icon with yellow background (8) indicates a mandatory parameter. As soon as all mandatory parameters are set, qpals automatically validates the input. If errors occur, the module and the violating parameters are highlighted in red. If the validation succeeds, the module will be highlighted in green. Be aware, that non-writable output and non-readable (or non-existing) input files trigger errors. Still, the execution of the module might work in a specific workflow.
User-provided options are protected against validation via the locked lock icon (5). All other options (4) may be overwritten by the validation. To change the status, click on the locked/unlocked lock.
When a module has validated (whether the validation was successful or not), it can be executed using the "Run now"-button (10). The progress bar at the bottom (15) will indicate the status. Since processing is sectioned into steps within OPALS modules, the bar will fill up to 100% for each step. The output of the module can be accessed by clicking on the text area left of the bar (14). It is also possible to stop a running module. This function should be used with caution and only as a last resort, because it may corrupt the odm- or any other file the process is writing to.
For many modules, the output can be directly visualized in QGIS. To do this, check the "Add result to canvas" box (11). qpals will take the value of the outFile parameter, if such a parameter exists, and try to visualize the contents. Vector and raster data native to QGIS/GDAL are supported as well as odm - for those, the default visualization method from the Settings is used. For all other files, qpals will first try to import the file to an odm using opalsImport and then visualize this odm.
Finally, the module selector may be used to build workflows. Module calls can be added to a "Run list" on the right side (13), which may be executed in succession, or exported as a Windows batch file. While reading of batch files is theoretically supported, only linear workflows (i.e. no loops, no gotos) will work as expected.
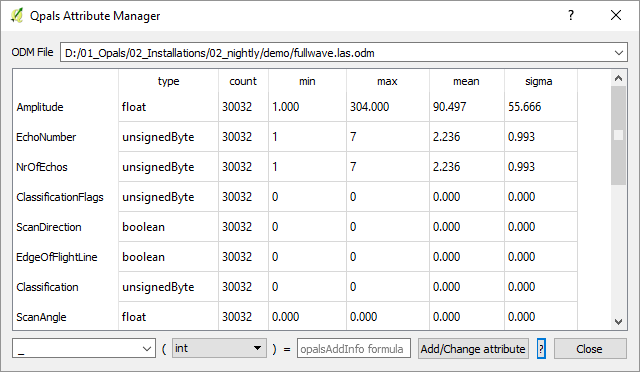
The qpals Attribute manager provides a quick overview of the attributes contained in an OPALS Datamanager. Drag-and-drop an odm layer or a file from your file explorer to the box at the top, and qpals will automatically load the attributes, their types as well as some statistics. This is essentially the output of opalsInfo parsed into a table.
At the bottom, an opalsAddInfo call can be made by supplying an attribute name (existing or new), type (if it is a user-defined attribute) and an AddInfo-formula. Be aware that by clicking the Add/Change attribute button, the calculation is started and might take some time, during which QGIS may freeze. It will recover after opalsAddInfo has finished.
Over time, more sophisticated modules are added, representing a typical workflow or typical subtasks. They rely on a number of OPALS-modules. The following modules are currently available:
qpals is still in active development, therefore especially the nightly builds may crash sometimes. If you have trouble getting the plugin to run at all, here are a couple of hints:
Bug reports can be sent to the OPALS Team. Please include a short description of what you were trying to achieve, using what type of files, and the text from the error message. To get additional output, open the python console in QGIS before running the steps leading to the bug. Copy-and-paste the messages printed to the console and include them in the bug report. Thank you!
 1.8.17